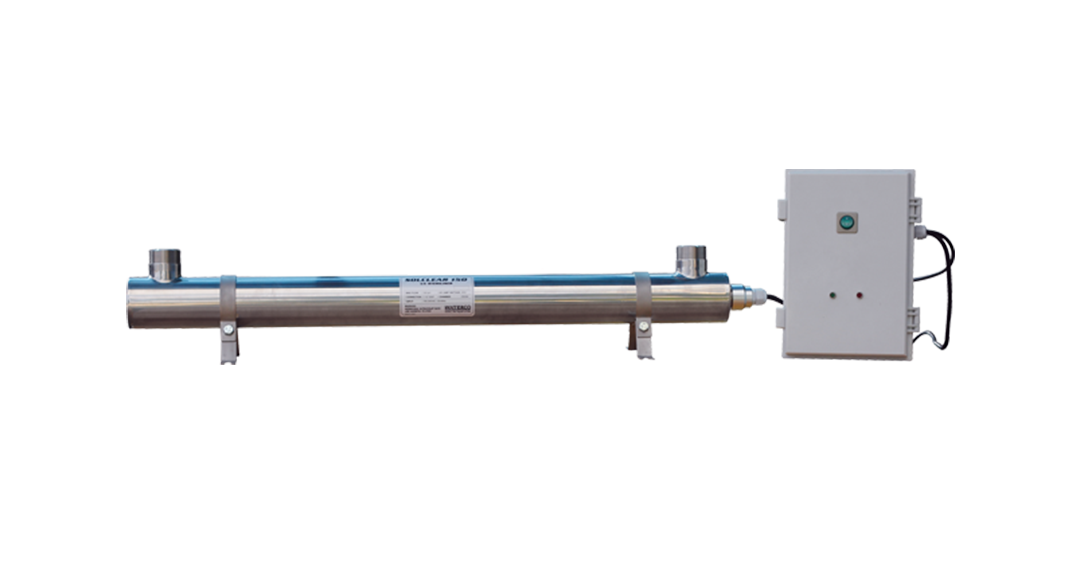
UV Sterilizers
The Sol clear UV steriliser uses environmentally friendly ultraviolet technology for the disinfection of water. It provides disinfection without the addition of any chemicals.
- Fountains
- Water features
- Koi ponds
Technical Specification
| Model | Flow Rate (gpm) | Flow Rate (lpm) | Quartz Thimble Size (mm) | Inlet & Outlet Size | UV Lamp | Lamp Wattage | Standard Ballasts | Controller Box Size (mm) | |
| Solclear 90 | 24 | 90 | D24.5 X 910 | 1 1/2" BSP | T540 | 40W | UV-6 | 190 X 280 | |
| Solclear 150 | 40 | 150 | D24.5 X 910 | 1 1/2" BSP | T540 | 40W | UV-6 | 190 X 280 |
Lamp life : 9000 hours Input voltage : 100-240Vac/50-60Hz
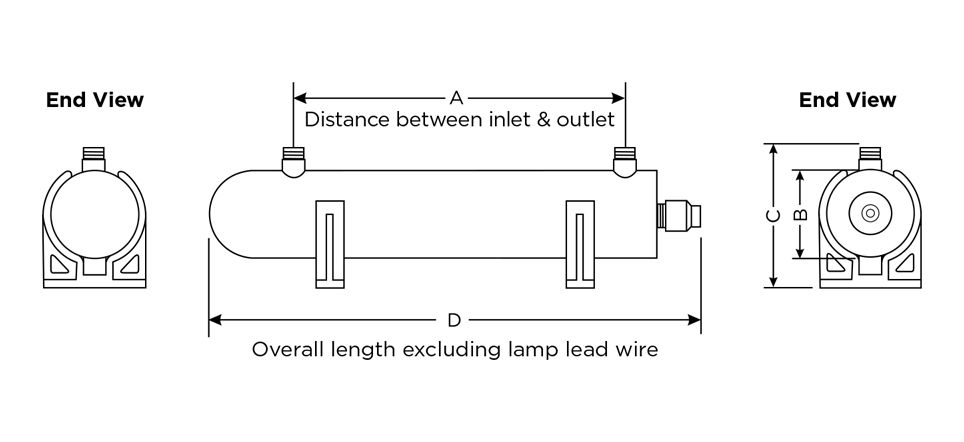
General View of Solclear 90
General View of Solclear 150
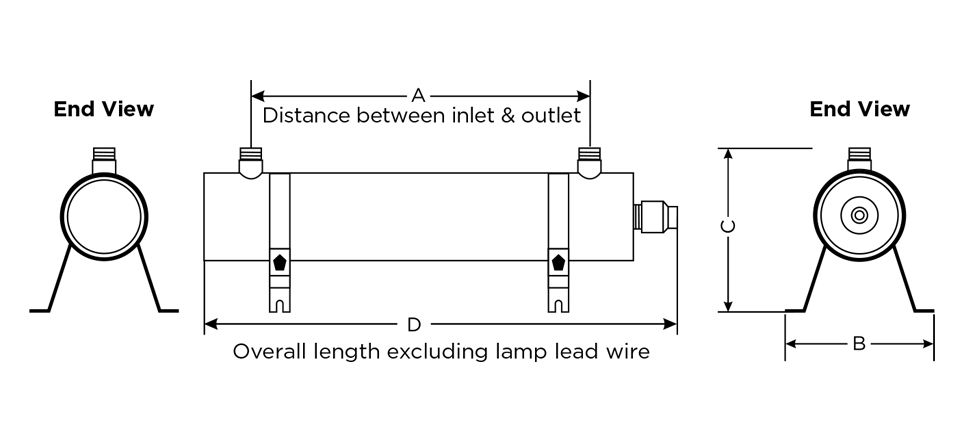
| Model | A | B | C | D | Inlet & Outlet Size | |
| Solclear 90 | 780mm | 63.5mm | 115mm | 925mm | 1 1/2" BSP | |
| Solclear 150 | 786mm | 175mm | 165mm | 926mm | 1 1/2" BSP |
NOTE: Line cord and lamp lead wire omitted for clarity. All figure tolerance 1%.
Notes :
- 1Do not allow Solclear UV sterilizer to freeze.
- Recommended ambient temperature: 2°C-40°C (36°F-104°F).
- Input voltage is 230VAC (190-260VAC) / 50-60Hz.
- Maximum recommended operating pressure is 100psi (6.9bar).
- The system and installation shall comply with applicable state and local regulations.
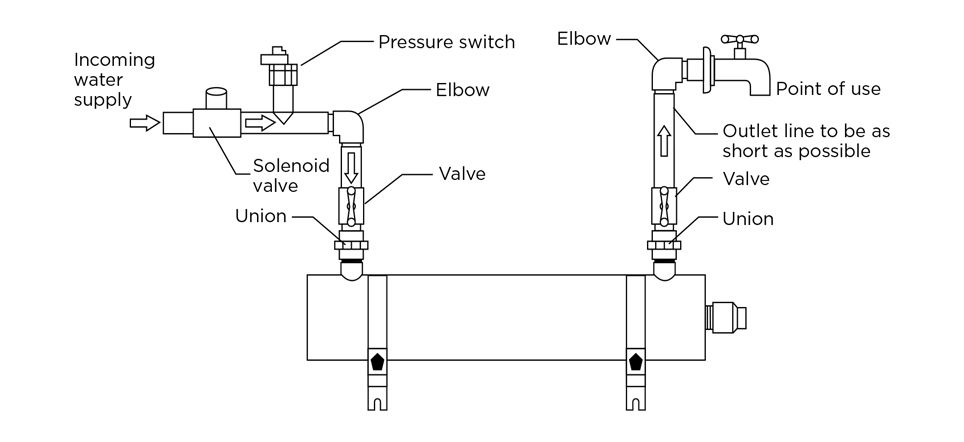
Installation Diagram
Assembly
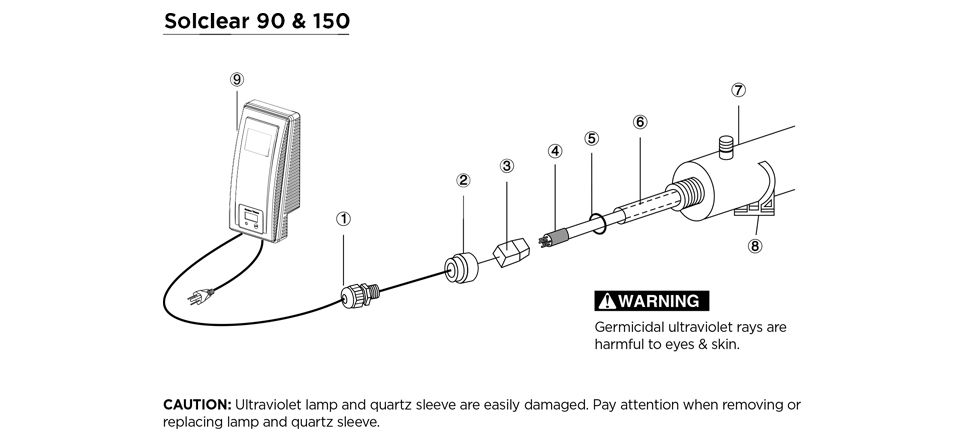
| Item | Description | Solclear 90 (Part No.) | Solclear 150 (Part No.) | |
| 1 | Water Proof Strainer | 64489 | 64489 | |
| 2 | Aluminium Nut | 725110641 | 725110641 | |
| 3 | Lamp Socket & Lead | 725110514 | 725110514 | |
| 4 | Germicidal Ultraviolet Lamp | 725110425 | 725110425 | |
| 5 | O-ring BS212 Silicone | 725912120 | 725912120 | |
| 6 | Quartz Sleeve | 725110413 | 725110413 | |
| 7 | Stainless Steel Chamber | - | - | |
| 8-a | Metal Clip | - | 725120042 | |
| 8-b | Plastic Clip | 725120041 | - | |
| 9 | Ballast | 725120054 | 725120054 |
Installation
- Install Solclear UV sterilizer in a readily accessible and well-lit location to facilitate inspection and maintenance
- Inspect for hidden electrical wiring or plumbing prior to drilling holes.
- Attach mounting clips to the wall.
- Insert chamber through mounting clips.
- Connect to plumbing.
- Install quartz sleeve and lamp.
Note: Avoid touching the sides of the quartz sleeve and lamp, handle by the ends only.
Ultraviolet lamp and quartz sleeve are easily damaged. Pay attention when removing or replacing lamp and quartz sleeve.
- Remove the aluminium / PVC nut (2).
- Slide carefully the quartz sleeve (6) from one end to another end of the chamber.
- Slide the O-ring (5) at the open end of quartz sleeve for Soclear 90 & 150.
- For Solclear 300, please put O-ring (5) at the both end of quartz sleeve.
- Tighten the aluminium / PVC nut (2) hand tight.
- Slide the lamp (4) into the quartz sleeve.
- Connect the lamp to the lamp socket.
- Tighten the water proof strainer (1) into the aluminium / PVC nut (2).
- Turn on the water and inspect for leakages. Rectify as necessary.
- Plug the ballast into an electrical outlet. An electrical outlet protected by a Ground Fault Interrupt (GFI) circuit is recommended.
- Run water through the chamber for 5-10 minutes prior to use.
REPLACING UV LAMP AND SERVICING UV SYSTEM:
- NOTE: Avoid touching the sides of the quartz sleeve and lamp, handle by the ends only.
- Disconnect power.
- Turn water off and open down stream of system to relieve pressure.
- Remove the water proof strainer (1) and unscrew the aluminium / PVC nut (2).
- Carefully withdraw lamp (4) approximately 2 inches from chamber (7).
- While holding lamp end carefully, remove lamp socket (3).
- Carefully withdraw lamp from chamber (7).
- Carefully remove O-ring (5) from the end of the quartz sleeve (6).
- Carefully remove the quartz sleeve (6).
- To reinstall, follow step 8 through 1 in reverse.
MAINTENANCE
- Quartz sleeve is to be cleaned every 6-12 months with glass cleaner.
- Quartz sleeve is to be replaced every 24 months.
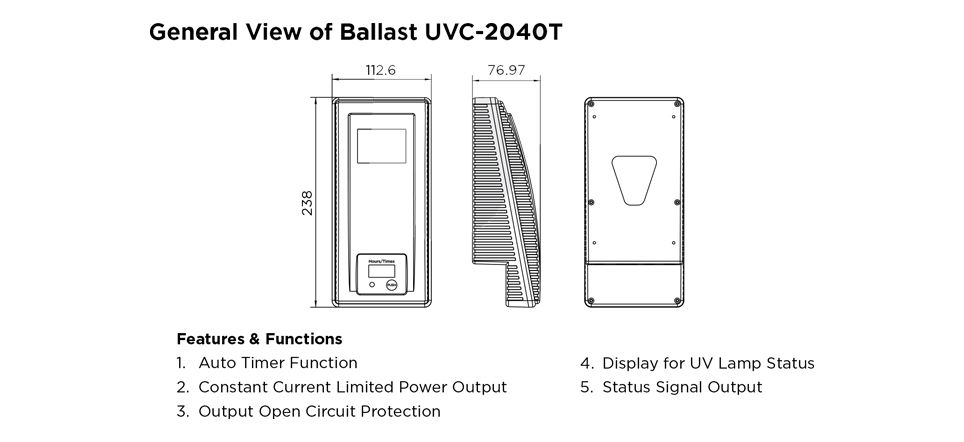
Electronic Ballast (for solclear 90 & 150 only)
Specifications
| Model | UVC-2040T | |
| Operation Voltage | AC230V (190-260) | |
| Input Frequency | 50-60Hz | |
| Input Amp | 0.3A | |
| Power Factor | > 0.9 | |
| Output Power | 10-40 W | |
| Output Frequency | 45kHz | |
| Start Mode | Instant Start | |
| Efficiency | > 83% | |
| Display Operation Setting | Digital LCD, setting program by 1 button | |
| Peak Coefficient | 1.6 | |
| Weight | 0.6kg | |
| Ballast Size | 238mm x 113mm x 77mm | |
| Operating Ambient Temperature | 0-40c | |
| IP Rating | IP 55 | |
| Certifications | CE | |
| Compatible UV Lamps | 20-40W |
Installation Instruction

- Dry contact signal output port
- Power input port
- Lamp output port
- The no. 1 port is a relay dry contact output. When the ballast is working normally, the dry contact is shorted, otherwise the dry contact is open. The withstand voltage is 250V, ampere rating is 5A. It can be connected to PLC, solenoid valve and others. If it is not used, please put the threaded cap on to avoid humidity and dust.
- The no. 2 port is power input port: standard power input port with 3pins. When plug the power cable into the input port, please push the plug into deep bottom of the port to have good contact.
- The no. 3 port is the power output for UV lamp
- # Note: please disconnect power before unplug all connectors.
- There are two ways to mount the ballast: (1) with hanging plate and (2) double sided tape.
- Press 'the button and hold it for 5 seconds, the timer will reset to the factory defaults.
- Quick press the button, the LED shows the used time of the lamp, then quick press the button again it shows the start-up times. If left idle for 2 seconds, the LED will return to show the remaining time
- When the remaining time is less than 300 hours, the ballast will sound alarm, and the LED will blink. Quick press the button, the ballast will stop sounding
- When the lamp life expired, the ballast sounds alarm, LED turns red, the lamp is turned off.
- When no lamp is connected or the lamp is damaged, the ballast sounds alarm and LED turn red.
- When situation as item 4 or item 5 happens, please turn to a new lamp and reset according to step 1 as above
| No | Problem | Solution | |
| 1 | When the ballast is connected to power, there is no display on LCD. | Please check the power is connected properly. | |
| 2 | When the ballast is connected to power, the lamp is not lighted up, but the ballast alarm sounds. | Please turn off power, check the connections between the ballast and the lamp separately, and tighten them again. |